Monday, July 16, 2012

Gorgonzola Stuffed Bacon Wrapped Dates

We made these stuffed dates last weekend for an appetizer when a couple friends were coming over for dinner.  Bacon is delicious on it's own, but wrapping it around sweet dried dates that are stuffed with tangy Gorgonzola cheese is an amazing combination.  Best of all, these are so easy to prepare, and you can make them in advance and then just bake them right before your guest are coming over.  The bacon gets crispy and the inside stays soft but is bursting with flavor from the cheese filling.  These are already wrapped up with a toothpick so they are easy to serve right out of the oven.

Ingredients:
10 strips of bacon, cut in half
20 pitted dates
4 oz Gorgonzola cheese, crumbled
1/3 cup softened cream cheese
tooth picks


Directions:
Pre-heat the oven to 350 degrees F.  Slice the dates in half long ways, cutting only through half of the date so it opens up like a pocket.  Blend the two cheeses together.  Place about a teaspoon of cheese into each date.  

Wrap a half slice of bacon around each date and seal it with a toothpick.  Because you will flip the dates half way through cooking, put the toothpick horizontally through the side instead of from top to bottom.   


Place the dates on a foil covered  baking sheet and bake for about 30-35 minutes or until the bacon is light brown and crispy.  (Flip the dates half way through cooking.)  Remove and serve hot!


Tuesday, July 10, 2012

Jambalaya with Grits

Anyone who knows me well knows that I love grits, especially cheese grits.  So when making jambalaya I took the opportunity to serve it over grits instead of cooking rice into the dish.  The jambalaya is full of flavor from the shrimp, sausage, and chicken combination, and goes well with the creamy and mild grits.  It would also be good over rice or pasta if preferred.  As always, adjust the spiciness to your own taste level.
Ingredients:
1 yellow or white onion, finely diced
1 green pepper, finely diced
2 celery stalks, finely diced
1 jalapeno with seeds, finely diced
3 cloves garlic, minced 
3 tablespoons olive oil
3 tablespoons cajun seasoning (or more to taste)
1/2 teaspoon cayenne pepper
3-4 fresh tomatoes, cored, seeded, and diced
1 lb chicken, cut into bite sized pieces (I used boneless skinless thighs, but white meat is fine too)
3/4 lb raw medium shrimp
3/4 lb smoked sausage, or spicy andouille sausage, diced
2 tablespoons butter
3 tablespoons flour
2 cups chicken broth
3 green onions, thinly sliced 
kosher salt and freshly ground black pepper


For the grits:
4 cups water
1 cup old fashioned grits
1 teaspoon salt (or more to taste)
1 cup shredded white cheddar cheese
dash of garlic powder
freshly ground black pepper


Directions:
Heat 2 tablespoons of oil in a large pot over medium heat.  Add the onion, celery, green pepper, garlic, and jalapeno.  Sprinkle in some kosher salt (1/2 teaspoon or so).  

While this mixture is sauteing, heat a skillet over medium-high.  Add the last tablespoon of oil and let it heat.  Sprinkle one tablespoon of cajun seasoning over the chicken and mix until it is evenly coated.  Place the chicken in the skillet and cook for 5-7 minutes until it is browning on the outside and cooked through.  Remove to a bowl.


Next, cook the shrimp.  Before placing them in the skillet, sprinkle them with cayenne pepper with some salt and pepper and mix until even.  Cook them for 1-2 minutes on each side until they are opaque and remove to the bowl with the cooked chicken.  
While you are cooking the proteins- remember to occasionally stir your veggies which should be reduced to medium-low.  They should be pretty soft by now, so add one tablespoon of cajun seasoning to the mixture, along with the tomatoes.  Next, on to the sausage. Add it to the empty skillet and cook for about 5 minutes until it starts to brown.  Remove it and place in the bowl with chicken and shrimp.  
Add all the cooked proteins to the vegetable mixture with 1 cup chicken broth and the final tablespoon of cajun seasoning.  
Put the butter in the skillet that has all of the sausage drippings, and reduce heat to medium-low.  Let the butter melt, and whisk in the flour.  The roux should start to bubble up as it cooks.  After about 5 minutes, add the remaining cup of chicken broth and whisk until it thickens.  This gravy will thicken the jambalaya mixture.  


Mix it in to the jambalaya and let this cook, covered over medium-low heat for about 5-10 more minutes before serving.  Make sure to taste it as you are cooking so it's seasoned properly!


For the grits- I would recommend starting them around the time the chicken is cooking.  Heat your water with salt to a boil and whisk in the grits.  Cover and turn heat to low.  Let this simmer, stirring occasionally, for about 20 minutes.  
Add the cheese, garlic powder, and more salt and pepper if needed.  Remove from heat until ready to serve.


Place a couple large spoonfuls of grits into a bowl, and top with jambalaya.  Top with sliced green onions.  Enjoy this spicy, savory, and creamy dinner!


Monday, July 2, 2012

Elote (Mexican Corn on the Cob)

The first time I saw elote, it was being sold on the street on a wooden skewer so customers could take it on the go.  It smelled delicious, looked amazing, and kids were gobbling it up like popsicles on a hot day.  I went home to research what this treat might be and discovered that it is elote - Mexican corn on the cob, which is actually incredibly easy to make.  I've found that microwaving the corn is the easiest and quickest way to cook it on the cob- and with a quick dressing of lime-mayo, queso fresco, and spicy smoked paprika you have a complete snack!
Ingredients:
- 4 ears corn on the cob
- 1/2 cup mayonnaise (preferably home-made)
- 1 lime, zested and halved
- 3/4 cup queso fresco or cotija cheese (you could also use feta but it is harder to crumble... this is what we used in the photos, and I think queso fresco is much better)
- spicy smoked paprika and cayenne pepper, to sprinkle on top according to your taste
Directions:
Place the corn cobs in husk on a plate, and microwave for 6 minutes. (or 1 1/2 minutes per cob if you do more or less)   Remove and let it cool until you can peel the husks without burning your hands.  If your corn is already shucked, wrap each piece in a damp paper towel to microwave. Peel away all of the husk and corn hair once you can handle the corn. While the corn is cooking, prepare your lime-mayonnaise.  Mix the mayo with the zest of one lime, and the juice from half of it.  Thickly spread this mixture over the corn.
On a separate plate, crumble the cheese.  Roll each piece of corn in the cheese until it is lightly coated.  Sprinkle with spicy smoked paprika and cayenne pepper.  Squeeze some fresh lime juice on top before serving.   A great dish to enjoy fresh summer corn!


Sunday, July 1, 2012

Chocolate Chunk Cookies

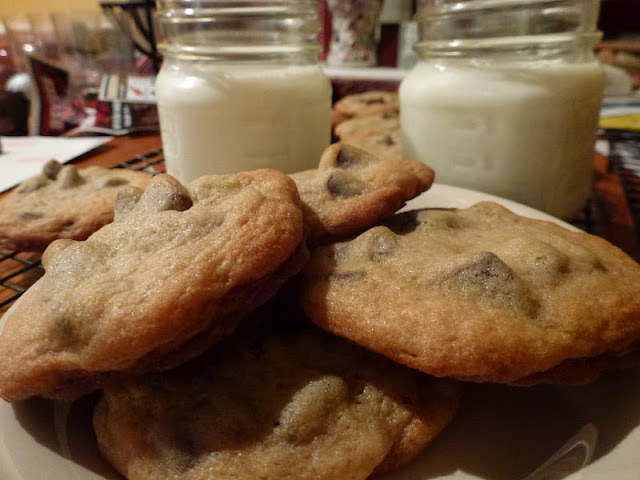
There's nothing unique or special about these cookies- they are pretty basic but of course super delicious.  The reason I'm posting them is because I want to have a collection of all recipes I love and know I will make again so I can easily reference them without searching through cookbooks or websites.  So, until I come across a better recipe this will be my go-to for chocolate chip cookies.  We used semi-sweet chocolate chunks instead of chips, and the cookies are soft and chewy rather than crispy.   This is a simple desert, but when you are craving chocolate chip cookies, it hits the spot every time!
Ingredients:
1 cup butter (two sticks) softened to room temperature
3/4 cup brown sugar
1/2 cup white sugar
1 1/2 teaspoon vanilla
2 eggs
1 1/2 teaspoons baking soda
3/4 teaspoon salt
3 1/2 cups all-purpose flour (we ran out and used half bread flour, and they came out fine)
2 cups semi-sweet chocolate chunks or chocolate chips

Directions:
Pre-heat oven to 350 degrees F.  Cream together the butter and sugar until smooth.

Next, add the eggs and vanilla, and mix until well combined.
Add the baking soda and salt.  Stir to make sure there are no baking soda lumps.  Then, add flour one cup at a time.

Once you have incorporated all of the flour, fold in the chocolate chunks until they are evenly distributed.  Place even-sized spoonfuls onto a greased baking sheet and bake for 9 minutes or until the edges have started to brown.  The middle of the cookie won't look like it's cooked all of the way through, but once they cool they will be fine.  This keeps the cookie chewy and soft. (we let ours go a little too far in the batch shown below on the baking sheet)


Move the cookies to a cooling rack and serve warm with a glass of cold milk.  Store in an air-tight container.  So yummy!


Tuesday, June 19, 2012

Refreshing Basil Limeade

With the insanely low-priced limes at our local Hispanic market (15/$1.00!) we have an abundance of fresh juicy limes at home all summer long.  The only problem is they don't last forever, and before long we end up throwing them away because we couldn't find ways to use them fast enough.  This time, we didn't let that happen.  I put Sean to work juicing 13 limes to make a batch of fresh limeade.  To give it a twist, we made basil-infused simple syrup for the sweetener.  This is so refreshing, and you can make each glass as sweet our sour as you like.  Enjoy it on a hot summer day!


Ingredients:
fresh-squeezed lime juice - (13 limes made about 1 1/2 cups, but you can do as much as you want)
1 cup sugar
1 cup water
1/2 cup fresh basil leaves
ice & more water, for serving


Directions: 
To make the basil- simple syrup, combine the sugar and water in a pot and bring the heat to medium.  Whisk to combine, and when the sugar has fully dissolved, remove it from the heat.  Stir in the basil.  Cover and let it sit until it comes to room temperature.  Refrigerate until ready to use.

To make a glass of limeade, combine several ice cubes with 1 cup of water and 3 tablespoons each of lime juice and simple syrup.  (You may want to use more or less of either to adjust according to your taste.)  The flavors are so fresh and delicious.  Enjoy!