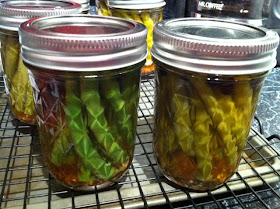
One of my qualities that Sean has learned to live with is my admitted addiction to sales. When I walk into a store, my eyes immediately scan for the bargains, and I magnetize to them, justifying my need for this discounted item. Not everything ends up being as useful as I think it will be at the time of purchase...(like the cute mini-bundt pan, or the over-sized cat Halloween costumes Pico despises) but my recent steal was immediately put to great use. My eyes were caught on the red clearance tag stuck to the 12-pack of canning jars at Target. Sean, knowing my bargain-buys can be a little impulsive, asked what we would use them for. I had to think of something we would both love, and it hit me- dilly beans! (I do give him credit for steering me away from the whole canning set I was tempted to put in the cart)
So, we went home and did something us procrastinators never usually do, we made our pickled green beans that very afternoon. We were able to can them just fine with our large pot. Two weeks wait, and we get to taste the fruits of our labor!
Recipe:
2 lbs fresh green beans, stems trimmed, and cut to fit the size of your jar
8 cloves garlic, halved
hot peppers (optional)
2 1/2 c white vinegar
2 1/2 c water
1/8 c salt
1/8 c sugar
fresh dill (we used dried... other herbs would work too)
peppercorns
red pepper flakes
whole mustard seeds
cayenne pepper optional
Gather your basic ingredients together, and then start preparing the jars for the canning. First, sterilize them by boiling for 5 minutes in a large pot of water.
Once the jars are sterilized, begin filling them with your ingredients. Start with the garlic, a sprinkling of various spices, and a hot pepper if you are using one. No need to measure the exact amounts going in each jar. We only put the peppers in a few of the jars because we weren't sure how hot it would make them. Then add the green beans, being careful not to over-stuff the jars. You want to leave a little room at the top.
Meanwhile, heat the vinegar, water, salt, & sugar to a boil. Make sure the salt and sugar are fully dissolved before ladling into the jars.
Then, put the lids on the jar until just barely tight, and return to the boiling pot of water for 6-8 minutes. This will seal the jars for better preservation. You can see the difference in appearance before and after this process below:
Store for 2 weeks before opening your first jar. Enjoy!
 |
| the final product! |


No comments:
Post a Comment