Showing posts with label baking. Show all posts

Sunday, November 4, 2012

Soft Pretzels

We always trust Alton Brown's recipes, so we relied on one of his to make soft pretzels for the first time last weekend.  It takes a bit of time and effort, but the result is a ton of light and buttery pretzels with a crispy outer crust.  You can make them as large or as small as you like.  These would be great to make for a party or football game.  They are delicious hot out of the oven, but not quite as good reheated.  We had them with mustard, but next time we'll try making a cheese sauce too.  We sprinkled a couple with cinnamon and sugar and that was also pretty tasty.  
Ingredients:
  •  1 1/2 cups warm water
  • 1 tablespoon sugar
  • 2 teaspoons kosher salt
  • 1 package active dry yeast (2 1/2 teaspoons)
  • 22 ounces all purpose flour (about 4 1/2 cups, but we measured ours with a scale)
  • 2 ounces (4 tablespoons) unsalted butter, melted
  • vegetable oil
  • 10 cups water
  • 2/3 cups baking soda
  • 1 large egg yolk, beaten with 1 tablespoon water
  • Kosher salt for topping

Directions:
Combine the water, sugar, and kosher salt in a bowl or measuring cup and sprinkle the yeast on top.  Mix and allow to sit for 5 minutes or until the mixture begins to foam.  
In a large bowl, combine this with the flour and butter and mix until all the dry ingredients are combined.  You can use a stand mixer or do this by hand.  We did it all by hand and they turned out fine.  


Once combined, knead the dough in the bowl until it is smooth and pulls away from the side of the bowl- about 4 to 5 minutes.  If using your stand mixer, do this on medium speed.  Remove the dough from the bowl, oil it well with vegetable oil, and then return the dough to the bowl making sure it is fully coated in oil.  
Cover the bowl with a towel or plastic wrap and let it rise for about an hour or until dough has doubled.  It will rise faster in a warmer temperature. You can't really tell from the picture, but our dough did rise and it was very smooth and stretchy.  
Cut your dough into 8 even pieces for large pretzels, or cut each of those in half to make smaller pretzels or pretzel knots.  You can really do them as big or as small as you would like, as long as you keep the thickness of the rope the same size.  
Oil your hands before rolling so they don't stick to the dough.  Press your piece of dough into a rectangle, and literally roll the dough up.  Then continue rolling with your hands until it has stretched out - 24 inches for the large pretzel, or 12 inches for the knots.   Meanwhile, heat your water with the baking soda until it comes to a rolling boil.  Use a wide pot if you want to do more than one at a time.  Also, preheat the oven to 450 degrees F and line two baking sheets with parchment paper.

We did a combination of large pretzels and smaller knots, because we couldn't really get our big pretzels to stick together.  Plus they are pretty big for a serving size.  To make the pretzel shape, take one end of the rope and circle it around, connecting a little past half way down.  Do the same with the other side and be sure to press the ends down so they stay together.  Not sure if that description make sense, but here is what they look like. 

When you've rolled out all your pretzels, you can begin boiling them.  (Or do both at the same time if you have a helper)  Drop one or two pretzels into the water.  Cook for about 30 seconds each, remove with a slotted spoon, and place on the parchment paper.  


Continue this process until all of the pretzels have boiled.  Brush the egg yolk mixture on top of each pretzel generously.  
Sprinkle with salt or other desired toppings.  Bake for 12-14 minutes or until the tops have turned dark golden brown.  Remove from oven and place on a cooling rack.  

Enjoy warm, plain or with a dipping sauce.  So good!!

Thursday, July 26, 2012

Grits Muffins

I've mentioned previously how much I love grits, and this is a great way to use your leftovers.  I used to dread the "recipes" my mom would come up with on her own when I was a kid, because in general they just weren't that good.  (or so I believed at the time and refused to try them).  But, this was one she came up with that I loved.   Using the grits as part of the batter makes the muffins buttery and moist with a bit of texture and density that is surprisingly delicious.  These are a great addition to a full breakfast, or as a side dish with dinner.  It's worth making extra grits on purpose just so you can make these the next day!  I made these with leftovers from our jambalaya.  

 Ingredients: (makes 10... I'll have to figure out adjustments to get it to a full dozen)
  • 1 cup flour
  • 1 cup cooked grits
  • 2 tablespoons sugar
  • 2 teaspoons baking powder
  • 1/2 teaspoon salt
  • 1 egg
  • 3/4 cup milk
  • 1/3 cup vegetable oil
  • 1/2 cup shredded cheddar cheese (optional) 
Preheat your oven to 400 degrees F.  Whisk together your wet ingredients (minus the grits).  Mix in all of the dry ingredients next, and finally fold in the grits and cheese if using.  The mixture will be a little lumpy but that's okay.
Pour into a greased muffin pan and bake for 20-25 minutes or until the tops have started to brown.   
Let them cool slightly before gently removing.  Serve hot.  (leftovers can be microwaved to reheat but they won't be quite as good)


Sunday, July 1, 2012

Chocolate Chunk Cookies

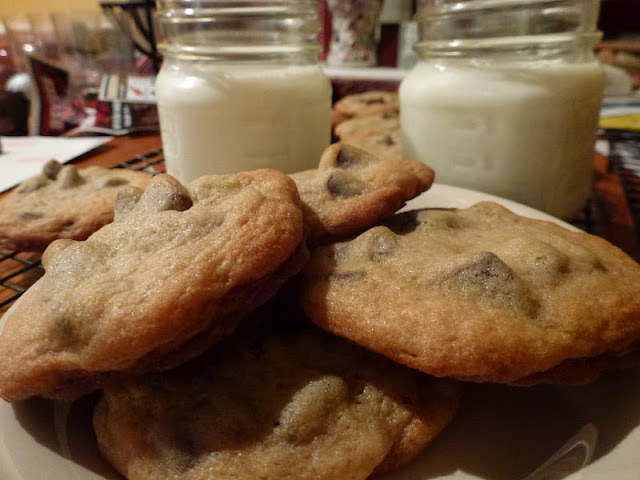
There's nothing unique or special about these cookies- they are pretty basic but of course super delicious.  The reason I'm posting them is because I want to have a collection of all recipes I love and know I will make again so I can easily reference them without searching through cookbooks or websites.  So, until I come across a better recipe this will be my go-to for chocolate chip cookies.  We used semi-sweet chocolate chunks instead of chips, and the cookies are soft and chewy rather than crispy.   This is a simple desert, but when you are craving chocolate chip cookies, it hits the spot every time!
Ingredients:
1 cup butter (two sticks) softened to room temperature
3/4 cup brown sugar
1/2 cup white sugar
1 1/2 teaspoon vanilla
2 eggs
1 1/2 teaspoons baking soda
3/4 teaspoon salt
3 1/2 cups all-purpose flour (we ran out and used half bread flour, and they came out fine)
2 cups semi-sweet chocolate chunks or chocolate chips

Directions:
Pre-heat oven to 350 degrees F.  Cream together the butter and sugar until smooth.

Next, add the eggs and vanilla, and mix until well combined.
Add the baking soda and salt.  Stir to make sure there are no baking soda lumps.  Then, add flour one cup at a time.

Once you have incorporated all of the flour, fold in the chocolate chunks until they are evenly distributed.  Place even-sized spoonfuls onto a greased baking sheet and bake for 9 minutes or until the edges have started to brown.  The middle of the cookie won't look like it's cooked all of the way through, but once they cool they will be fine.  This keeps the cookie chewy and soft. (we let ours go a little too far in the batch shown below on the baking sheet)


Move the cookies to a cooling rack and serve warm with a glass of cold milk.  Store in an air-tight container.  So yummy!


Thursday, June 7, 2012

Banana Bread


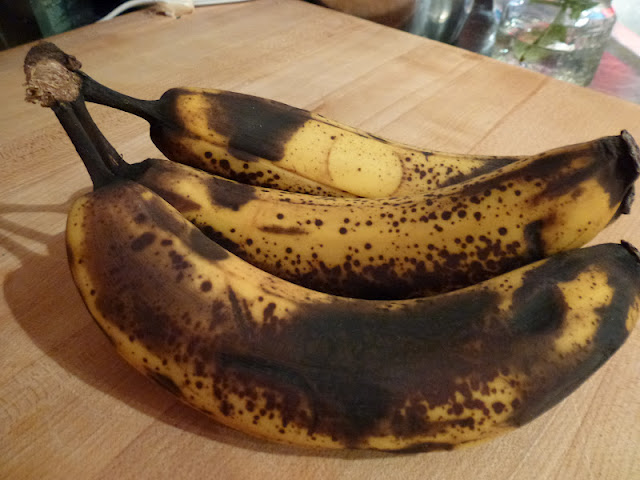
Banana bread is simple but delicious- and obviously one of the best ways to use up ripe bananas.  I'm one of those people who prefers to eat bananas when they are just barely ripe and aren't as sweet.  So as soon as I see a couple brown spots I know they are past their prime (in my eyes) and I just save them for banana bread.  There are a few basic steps involved but the recipe is overall pretty simple.  The bread comes out extra moist because of the sour cream that gets mixed into the batter.  This recipe makes two loaves so you can share one with friends or family!

Ingredients:
1 cup butter, softened
1 1/2 cups sugar
4 eggs
2 teaspoons vanilla
2 teaspoons baking powder
2 teaspoons baking soda
1 teaspoon salt
3 cups flour
1 cup sour cream (could substitute plain Greek yogurt)
3-4 ripe bananas (about 2 cups mashed)
You know your bananas are ready when they look like this!
Mash them up and they look like this-
Directions:
Preheat oven to 350 degrees F.  Prepare two greased loaf pans (8x4 or 9x5).  Cream together the butter and sugar until light and fluffy. 


Add the eggs and vanilla and mix well.  (I did this all by hand).  Next, add the salt, baking soda and baking powder and stir to combine. 


Finally, add the flour.  Mix until the flour has been completely incorporated into the batter.  Fold in the sour cream and mashed bananas and mix until combined.  


Pour half of the batter into each loaf pan and bake for about 50 minutes or until a knife inserted in the middle comes out clean. 

Let it cool for at least 30 minutes before slicing. Store in an airtight container or plastic bag at room temperature.