Showing posts with label sesame. Show all posts

Sunday, February 26, 2012

Kimchi-Bacon Noodles

Kimchi and bacon are really a great combination.  The spicy and tangy cabbage mixed with salty smoky bacon is seriously delicious.  Not surprisingly, this recipe came from Serious Eats.  I had been wanting to make it for a while, and after ordering a fresh jar of organic kimchi and a thick slab of bacon from Arganica, I was ready and armed.  This is a recipe where the taste of the kimchi can really change the flavor of the dish, so taste it first to get an idea of what else you may need to add or forgo.   I couldn't find gochujang, a Korean hot pepper paste, so I improvised with my own mixture of ingredients we had on hand.  It turned out amazing, I have to say... though it's hard to mess up when bacon is involved.
Ingredients(after making it once, I recommend doubling the recipe because you will want leftovers!)
8 ounces thin spaghetti 
6 ounces bacon, chopped 
1 cup kimchi, chopped 
2 garlic cloves, minced 
1 T miso paste
1 T sriracha (hot pepper sauce- reduce this if you want it less spicy
1 t rice vinegar
1 t sesame oil
(you can replace above 4 ingredients with 2 T gochujang if you have it)
1 tablespoon butter 
2 scallions, green parts only, chopped 
Sesame seeds, for garnish 
Salt and pepper

Directions:
Bring a large pot of salted water to a boil.  Cook the pasta until al dente, reserving a few tablespoons of the cooking water.  Drain and set aside.  Meanwhile, in a large skillet, cook the bacon over medium heat until it is crisp.  Remove it with a slotted spoon, leaving the drippings in the pan. 


In a small bowl, combine the miso, sriracha, vinegar, and sesame oil and stir to combine. 
Add the kimchi and garlic to the skillet and cook for about one minute before adding the sauce mixture.

Add the pasta to the skillet and stir until well combined.  Add the butter and stir the pasta as it melts.  Taste for salt and pepper. 
Serve with green onions and bacon, and sprinkle with sesame seeds.  Yum!

Saturday, February 25, 2012

Bagels!

I've always loved fresh bagels, and bagels in general were a staple for me growing up.  I would eat bagel sandwiches, toasted bagels with American cheese, bagels with peanut butter, with honey-butter, with cream cheese, breakfast bagel sandwiches... the list goes on and on.   I still remember watching a cooking show when I was in high school on PBS (we had about 8 channels) and the chef made bagels from scratch.  I decided at that moment that I would try and make my own bagels.  It did seem a bit complicated though...  About 10 years later I finally accomplished that goal, after being inspired by a recipe on Serious Eats that made it look so easy.   I've made them twice now, and while it takes effort, it is definitely worth the result.  Bagels fresh from the oven, with any topping you want.  This is a great way to impress your guests for brunch, or to enjoy all by yourself!  We had these with some cream cheese, smoked salmon, capers, green onion, and sliced shallot.  After a day, they are best toasted. 

Ingredients: (Makes 8 medium sized bagels)   
530g bread flour (3 1/2 cups)
7 g instant dry yeast (2 1/2 t; or 1 envelope active dry)  
43g sugar (2 T) 
16g salt (1 t) 
340g hot water (1 1/2 cups, 120°–130°F)
2 T molasses or malt syrup (for the boiling water)
1 egg beaten with 1 t water (optional, for toppings)
Toppings (such as sesame seeds, poppy seeds, dried onion or garlic flakes, cinnamon & sugar, or whatever else you would like) 
*NOTE* if you want to make them ahead of time and cook the following day, there is an alternative method, using ice cold water instead of hot water.  Instructions for both methods included. 

Directions:
Add all the dry ingredients to a bowl and stir until combined. Slowly add the water, while stirring.  Once all the water has been added and all of the flour is incorporated, begin to knead the dough for 5-7 minutes, until soft and elastic. I had to add a few more teaspoons of flour as I was kneading when it got too sticky.  Alternatively, you could do this in a food processor.  I did it by hand and it worked out fine.  
Transfer dough to a large, lightly oiled bowl and cover tightly with plastic wrap. Let rise until doubled in bulk, about 1 hour. For the make-ahead version, you skip this step and form the bagels immediately.  Divide the dough into 8 equal portions.  Between your hands, roll each piece of dough into a thick rope, long enough to wrap into a circle with a hole in the middle of about 1 inch diameter.  Connect the two ends of the rope and pinch the dough together so that it sticks into a circle.  
Place the bagels on a baking sheet lined with wax paper.  Cover with plastic wrap.  If you did these the night before, place the tray into the fridge until the next day.  If not, leave them out on the counter until your water comes to a boil.
If you formed the bagels the night before, take them out of the fridge to come to room temperature for one and a half hours before you cook them.  They should rise slightly during this time.  
Prepare the boiling water: Add the malt syrup or molasses to 6 quarts of water over high heat and let it come to a boil as the bagels rise for an additional 10 minutes.  Preheat the oven to 400°F.
Place the bagels into the boiling water, 2 at a time.  Let them boil for 1 minute, and flip them to boil with the other side up for 30 seconds more.  Remove them from the water with a skimmer and set them on a dry kitchen towel while you continue with the next batch. 

After all the bagels have boiled, place them back on the wax paper covered baking sheet and brush with the egg wash.  Sprinkle your toppings over the bagels generously.  We used sesame and poppy seeds this time.  
Place the bagels on a sil-pat covered baking sheet.  (If you don't have a sil-pat, just use a regular baking sheet)  
Bake until golden and shiny, about 20-25 minutes.  If you are using a sil-pat, the bagels will be evenly browned on both the top and the bottom.  If not, you may want to flip the bagels at the 20 minute mark and cook with the opposite side up for an additional 10 minutes.
Let the bagels cool for at least 15 minutes before eating.  Serve with your favorite cream cheese or other goodies such as smoked salmon as seen below.  If you are missing a local bagel shop like our neighborhood is, you should really give these a try!


Wednesday, January 11, 2012

Sesame Cookies

I know what you're thinking... sesame seeds and cookies don't really go together.  That's what I thought too, but out of desperation for something to make with our leftover homemade tahini, I came across this recipe on Epicurious.  I was hesitant, but I didn't want it to go to waste so it was really my only option.  The cookies turned out great- they had a delicious nutty flavor and almost melted in your mouth.  The sesame seeds on the outside didn't overpower the actual cookie either.  Have these with some blackberry jam for a fancy twist on peanut-butter and jelly.  These little cookies were so tasty that it would be worth it to make tahini just for them!

Ingredients:
1 1/4 cups flour
1/2 t baking powder
1/4 t salt
1/2 cup (one stick) unsalted butter, softened to room temp
1/2 cup sugar
1/2 cup tahini
1 t vanilla
1/2 cup sesame seeds (white or black) for rolling (Again, I recommend getting these from a Hispanic or Japanese grocery store so they aren't as expensive)

Directions:
In a stand mixer (or by hand) mix together butter and sugar until light and fluffy.  Then, add tahini and vanilla and mix. 
Next,  add baking powder, salt, and slowly incorporate flour until mixture is well combined.  (It will be a bit crumbly.)  Form it into a ball or log, and wrap it up in plastic wrap.  Chill for one hour.
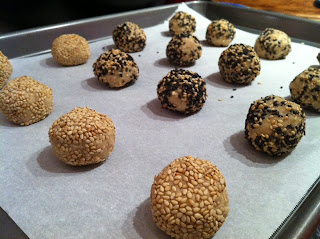
Preheat your oven to 350 degrees F and prepare your pan with parchment paper.  Begin forming tablespoon-sized balls with your hands and roll them in the bowl of sesame seeds.  We started with white sesame seeds, and then decided on a white/black combination.  There's no difference in flavor between the two.


Place the cookie dough balls on the baking sheet, about 2 inches a part. Bake for 12-15 minutes or until cookies are puffed and starting to crack on the outer surface.  Remove from the oven and let them sit on the baking sheet an additional 10 minutes before transferring to a cooling rack.


Enjoy with a glass of milk!


Friday, January 6, 2012

Tahini

This recipe would go in a category I call "why buy it when you can make it?"  Tahini is a sesame paste, made solely of toasted sesame seeds and oil.  You grind the mixture in a food processor and end up with tahini!  If you aren't familiar with tahini, it is an ingredient used mainly in Greek, Turkish, and Middle Eastern foods.  It has a consistency similar to natural peanut butter.  Most commonly for us it is used in hummus, which we love to make from scratch.  Tahini is a key ingredient in hummus and I used to buy it from the store for the very expensive price of $8 a jar!  It has much stronger flavor when you make it from scratch, and if you can find decently priced sesame seeds it is insanely cheap.  We get our sesame seeds from either the Hispanic or Japanese grocery stores because they have the best prices.   After our first time making tahini, we also used it for sesame cookies which were surprisingly tasty. 
Ingredients:
2 cups sesame seeds (you can change this amount depending on how much you want to make)
1/3 cup olive oil 
 Directions:
Preheat oven to 350 degrees F.  Toast sesame seeds by placing them on a baking sheet or stone and cooking  for about 5-7 minutes or until lightly toasted without browning.   If your sesame seeds are already toasted, I would still recommend toasting for an additional 3 minutes.  Let them cool slightly before continuing. 

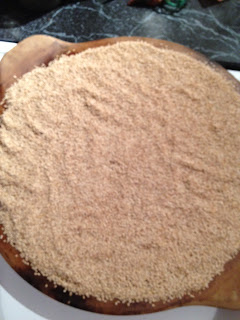
Place sesame seeds in a food processor.  Pulse for 3-5 seconds.  Begin adding oil and continue to blend until the consistency has come to that of a natural peanut butter.  It should be smooth without being saucy.  The tahini I've purchased at the store is much smoother than this version, but in a food processor I think this is the closest you are going to get (and it won't make a difference in your recipe.)   Add a pinch or two of salt to bring out the flavor.  Done! Keep in a covered container at room temp for 4-5 days or in the refrigerator for up to 3 weeks.