Tuesday, April 24, 2012

Avocado Pound Cake

I saw this recipe on serious eats, and with a ripening avocado holding on for it's life in the fridge I knew it would be a perfect way to use it.  Plus it's an idea I never would have though of on my own.  I love pound cake, but I've never actually made one before so this was something truly new for me.  The mashed avocado gives it a greenish-yellow tint and the cake is soft on the inside and slightly crisp on the outside.  It also has some ground cornmeal in it for texture.  It had a couple flaws, but overall I think it was a success.  Next time I'll make it less sweet- along the lines of a banana bread which I think might bring out the flavor of the avocado.
Ingredients(makes one loaf)
1 1/2 cups all-purpose flour 
1/4 cup yellow cornmeal 
1/4 teaspoon salt 
3/4 teaspoon baking powder 
3/4 teaspoon baking soda 
6 tablespoons unsalted butter, softened 
1 1/2 cups granulated sugar 
1-2 ripe mashed avocados (I used one but I would use more the next time)
2 large eggs 
1 teaspoons pure vanilla extract 
1/3 cup buttermilk (I actually used regular milk)

Directions:
Preheat the oven to 350 degrees F and prepare a well-greased loaf pan.  Combine the butter and sugar together in a bowl and cream together until the mixture is soft and fluffy.  
Next, add the avocado and mix until well blended. 

Add the eggs and vanilla and mix well.  
Stir in the milk until it is incorporated into the batter, and then finally add all of the dry ingredients.  Fold the dry ingredients in gently, and then continue to mix until the batter is smooth.  I did this all by hand, but a stand mixer may be easier for you.
 
Pour the batter into your greased loaf pan and bake on the center rack at 375 degrees for 50 minutes to one hour.  
Ours took the full hour, but you should check yours earlier just in case.   Let it cool for at least 30 minutes before turning upside down to dump the cake out.  Mine stuck to the bottom slightly, but I don't think I greased the pan well enough.  You can see how the texture changes once the cake has cooled in the photos below, the second one take one day after the cake was baked.

It keeps well at room temperature for about 4 days, wrapped in plastic or foil.  The cake was delicious, but very sweet.  The outer crust was crispy and chewy and had great texture.  I was also hoping I would actually taste some avocado flavor but I didn't.  I think it was partially from the sweetness level, but also it could have used more avocado.  Like I said above, next time I make this I'll try to make it more of a sweet bread than a cake.  It is definitely a unique way to change up a normal pound cake recipe! 


Monday, April 23, 2012

Spicy Maple Rosemary Carrots

We usually just eat carrots fresh in salads or by themselves as a snack.  But recently we had a ton of carrots to use up and so we decided to roast them to have as a side dish along side meatloaf.  I decided to make a sweet and spicy flavor profile to complement the savory meatloaf.  To incorporate some freshness I added rosemary to the carrots as well. The maple and cayenne really work well together, and this is a super easy side dish to throw together for any meal.  


Ingredients:
1 lb carrots (more or less)
3-4 tablespoons maple syrup (agave nectar, or honey would work too)
1 tablespoon olive oil
1 tablespoon rosemary, roughly chopped
1/4 teaspoon cayenne pepper
1/4 teaspoon freshly ground all spice
Salt and Pepper
Directions:
Heat the oven to 400 degrees F.  Peel the carrots (unless you are using baby carrots)  Slice into 2 inch pieces, or leave whole if they are on the smaller side.  In a bowl, toss the carrots with the syrup and olive oil.  Sprinkle the spices in and mix well.  Salt and pepper to taste- I would recommend about 1 teaspoon salt and 1/4 teaspoon pepper.  

Spread the carrots out on a foil covered baking sheet (easier to clean up) and roast in the oven for 20-30 minutes or until you can easily insert a fork into one of them.  The smaller they are, the less time they will need.  Enjoy!


Friday, April 20, 2012

Spaghetti Sauce

This recipe isn't completely homemade because we use a jar of sauce as the tomato base, and then just add a whole bunch of other stuff to make it taste better and more nutritious.   While fresh tomatoes are great, they aren't always in season, and are a lot more expensive than buying the already made sauce or canned tomatoes.  We did however use fresh herbs which added some extra flavor.  Finely diced onion, carrot, and celery make a great base for the sauce, and they add some texture to the final product.  We always use ground beef or turkey in our sauce, but the meat could be omitted.   This is far from your typical "marinara" sauce you might think of going with spaghetti- but in my opinion it's so much better!


Ingredients:
1-1.5 lbs ground beef or turkey
1/2 t red pepper flakes
2 celery stalks, finely diced
1 onion, finely diced
2 carrots, finely diced
2 cloves garlic, minced
salt and pepper
1 jar of tomato sauce (we like Classico or Bertolli)
1 14 oz can of diced or crushed tomatoes
2 Tablespoons freshly chopped herbs (we used oregano, thyme, and basil from the garden)
Freshly grated Parmesan

Directions:
In a large sauce pan over medium heat, brown the meat with a teaspoon of salt and the red pepper flakes.  Break up the meat as it browns, and when it is done drain it with a slotted spoon into a bowl and set aside.  
Remove some of the fat, until you are left with about two tablespoons worth in the pan (enough to generously coat the bottom of the pan).  Add the celery, onion, and carrot and stir to combine.  Add 1/2 teaspoon salt.  Cook over medium to medium-low for about 6-8 minutes until the vegetables have softened, and then add the garlic.  Cook for 3-4 minutes longer.  

Add the sauce and canned tomatoes, and then mix in the fresh herbs.
Bring the sauce to a simmer and turn to low heat.  Add the ground beef and continue to simmer, covered, for about 15-20 minutes.  Taste for salt and pepper.
Boil your favorite pasta to have with the sauce and sprinkle with the freshly grated Parmesan on top before serving. 


Monday, April 16, 2012

French Onion Soup

I really have a hard time resisting "buy-one-get-one-free" deals at the grocery store.  At some stores, you can just buy one and still get it for 50% off, but at our local grocery store, you have to get two in order to get the deal.  So, when I saw the bags of onions with the sale sign on them, I grabbed two without thinking about how hard it would be to use them all.  I hate to admit, but more often than not we end up throwing food away when I buy more than we can use before it goes bad.  And that pretty much ruins the idea of getting it on sale.  So with several onions on the verge of dying, I knew that French onion soup would be a great way to use them up.  We picked up a baguette from the French bakery to use as the perfect topping, underneath the melted Gruyere cheese.   This recipe came from Tyler Florence on food network.
Ingredients:
1/2 cup unsalted butter
5 onions, sliced (we used a mixture of yellow and red)
2 garlic cloves, minced
2 bay leaves
2 fresh thyme sprigs
Kosher salt and freshly ground black pepper
1 cup red wine
3 tablespoons all-purpose flour
2 quarts beef broth (or less if you want it a little thicker)
1 baguette, sliced
1/2 pound grated Gruyere

Directions:
In a large soup pot, melt the butter over medium heat.  Add the onions, garlic, bay leaves, thyme, a teaspoon of salt, and some pepper and stir until combined.

Cook, stirring every few minutes, until the onions are very soft and caramelized, about 30-40 minutes. 
Add the wine, reduce the heat, and simmer until the wine has evaporated and the onions are dry, about 5 minutes. Discard the bay leaves and thyme sprigs. Sprinkle in the flour, and stir. Turn the heat down to medium low so the flour doesn't burn, and cook for about 10 minutes to cook out the raw flour taste. 
Now add the beef broth, bring the soup back to a simmer, and cook for 10 more minutes. Season, to taste, with salt and pepper. 
 When the soup is almost done, preheat the broiler.  Ladle the soup into oven-save bowls, top each with 2 slices of bread and top with cheese. 
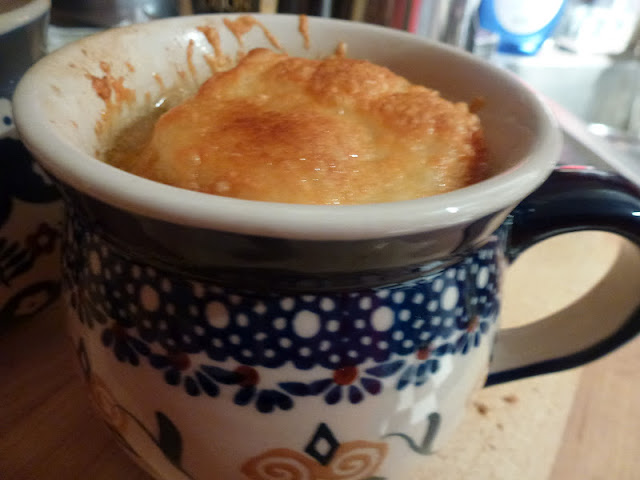
We stacked the bread because the openings of the mugs were so small.  Put the bowls into the oven to toast the bread and melt the cheese.  Watch carefully so it doesn't burn!

If you don't have oven-safe bowls, you could arrange the baguette slices on a baking sheet in a single layer, sprinkle the slices with the Gruyere, and broil until bubbly and golden brown, 3 to 5 minutes.