Tuesday, June 19, 2012

Refreshing Basil Limeade

With the insanely low-priced limes at our local Hispanic market (15/$1.00!) we have an abundance of fresh juicy limes at home all summer long.  The only problem is they don't last forever, and before long we end up throwing them away because we couldn't find ways to use them fast enough.  This time, we didn't let that happen.  I put Sean to work juicing 13 limes to make a batch of fresh limeade.  To give it a twist, we made basil-infused simple syrup for the sweetener.  This is so refreshing, and you can make each glass as sweet our sour as you like.  Enjoy it on a hot summer day!


Ingredients:
fresh-squeezed lime juice - (13 limes made about 1 1/2 cups, but you can do as much as you want)
1 cup sugar
1 cup water
1/2 cup fresh basil leaves
ice & more water, for serving


Directions: 
To make the basil- simple syrup, combine the sugar and water in a pot and bring the heat to medium.  Whisk to combine, and when the sugar has fully dissolved, remove it from the heat.  Stir in the basil.  Cover and let it sit until it comes to room temperature.  Refrigerate until ready to use.

To make a glass of limeade, combine several ice cubes with 1 cup of water and 3 tablespoons each of lime juice and simple syrup.  (You may want to use more or less of either to adjust according to your taste.)  The flavors are so fresh and delicious.  Enjoy!


Saturday, June 16, 2012

Spicy Asian Salmon & Rice Salad

This recipe was inspired by a Summer Rice Salad recipe contest sponsored by the USA Rice Federation.  The winners haven't been announced yet, but I think our recipe is a definite contender.  We decided on an Asian theme and Sean really wanted to incorporate nuoc mam, a tasty and spicy Vietnamese sauce we usually eat with egg rolls.  The flavors of the salmon, green onion, and fresh basil really come together for a deliciously fresh rice salad.  The carrot gives it some crunch, as does the optional fried rice to sprinkle on top.  This is best served at room temperature, or slightly cooled.  Enjoy!
Ingredients:
4 cups medium-grain rice, cooked and at room temperature (about 2 cups uncooked rice, cooked according to directions with at least 1 teaspoon salt)  To bring the rice to room temp faster, spread it out onto a large platter or in a bowl.  
1/2 cup nuoc mam, divided (recipe below)
1 lb boneless skinless salmon filet
2 green onions, minced (white and green parts)
2 carrots julienned (thinly sliced)
1/2 cup fresh basil leaves, minced (save a few whole leaves for cooking the salmon)
oil for frying (optional- if you choose to do the fried rice topping) 
2 limes, juiced
For the nuoc mam:
3/4 cup water
1 1/2 tablespoons sugar
3 tablespoons rice vinegar
2 tablespoons fish sauce
2 cloves garlic, minced
1/2 teaspoon salt
2-4 Thai chili peppers, minced (more or less to taste, and you could use other types of hot peppers as well)
To make the sauce, heat the water in a small pot and add the sugar.  When fully dissolved, remove from heat and add the remaining ingredients.  Stir to combine and refrigerate until ready to use.  Makes about one cup.

Directions:
Marinate the salmon in a zip-lock bag with 1/4 cup of the nuoc mam for 10 minutes.  Preheat the broiler of your oven.  Place a few basil leaves onto a baking dish and place the salmon on top. Sprinkle with salt and pepper, and broil for about 12 minutes or until fully cooked through.  Place it on a plate and let it cool slightly.  Squeeze the juice of one lime over the fish.  Next, flake the salmon into small bite sized pieces.

Pour the remaining 1/4 cup of nuoc mam and lime juice over the rice and stir to combine well.  This gives the rice a delicious tangy and sweet flavor.  Add the green onion, carrots, and basil to the rice and stir to combine.  Finally, mix in the salmon.  

Taste for more salt and pepper.  For the optional crispy rice topping- heat some vegetable oil over medium-high heat in a small pot.  Put a couple spoonfuls of plain cooked rice in the hot oil and break it up with a heat-proof spatula.  
When it starts to brown, remove onto a paper-towel lined plate.  Break into small pieces and serve on top of the rice salad.  (this is what looks like crumbled bacon in the photos!)
Serve at room temperature.  This is delicious and healthy- makes a great lunch or dinner!

Tuesday, June 12, 2012

Fried Plantains

Update!  Original post below, but here are some more pictures of our plantains when they were actually ripe enough.  It makes a huge difference!  They were slightly crispy on the outside, but sweet and moist on the inside.  They really melt in your mouth.  The ripe plantain was much easier to peel too, as you can see in the picture.


Original Post: When we bought plantains at our local Hispanic market we had no idea how long they would take to ripen!  We patiently waited about 3 weeks until I decided they were dark enough.  
In hind sight, we didn't let them go nearly long enough to result in the soft, sweet, fried plantains we were imagining.  But we still had fun making them for the first time, and I've looked up some tips to make the recipe better when we make them again.  These were still crispy and flavorful - but not as soft and sweet on the inside as we thought they would be.   Apparently, for ripe plantains you really have to let them become pitch black, and even slightly soft to the touch.  One suggestion I found is to beat them with a wooden spoon before peeling because it is supposed to soften them even more.  I also read that placing them in a paper bag with an apple speeds up the ripening process so I'm going to try that next time.  We'll see... in the meantime, here is our recipe!

Ingredients:
2-3 ripe plantains
1/4 cup oil
salt and sugar to sprinkle on top

Directions:
When peeling, don't treat plantains like you would bananas.  They are much tougher to peel.  Cut the tip of the plantain, and then cut slits down the peel, length-wise.  Use a butter knife to help you peel back each piece of the peel slowly so you don't rip off the fruit with it.  

Next, cut the plantains about 1/4-1/3 inch thick, on the diagonal.  
Heat the oil over medium in a cast iron skillet.  Place the plantains into the hot oil and let them cook for 3-5 minutes until they are golden-brown and crispy on the bottom side.  


Flip and cook the opposite side until it turns golden-brown too.   Remove and place on a paper towel lined plate to drain some of the oil.  
Sprinkle salt and sugar over the plantains immediately and serve hot.  We had them with some yellow rice and black beans, along with our mango salsa.  It was a tasty combination!


Thursday, June 7, 2012

Banana Bread


Banana bread is simple but delicious- and obviously one of the best ways to use up ripe bananas.  I'm one of those people who prefers to eat bananas when they are just barely ripe and aren't as sweet.  So as soon as I see a couple brown spots I know they are past their prime (in my eyes) and I just save them for banana bread.  There are a few basic steps involved but the recipe is overall pretty simple.  The bread comes out extra moist because of the sour cream that gets mixed into the batter.  This recipe makes two loaves so you can share one with friends or family!

Ingredients:
1 cup butter, softened
1 1/2 cups sugar
4 eggs
2 teaspoons vanilla
2 teaspoons baking powder
2 teaspoons baking soda
1 teaspoon salt
3 cups flour
1 cup sour cream (could substitute plain Greek yogurt)
3-4 ripe bananas (about 2 cups mashed)
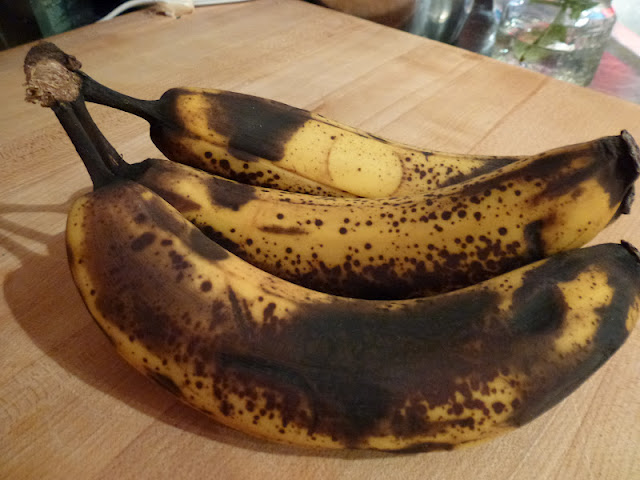
You know your bananas are ready when they look like this!
Mash them up and they look like this-
Directions:
Preheat oven to 350 degrees F.  Prepare two greased loaf pans (8x4 or 9x5).  Cream together the butter and sugar until light and fluffy. 


Add the eggs and vanilla and mix well.  (I did this all by hand).  Next, add the salt, baking soda and baking powder and stir to combine. 


Finally, add the flour.  Mix until the flour has been completely incorporated into the batter.  Fold in the sour cream and mashed bananas and mix until combined.  


Pour half of the batter into each loaf pan and bake for about 50 minutes or until a knife inserted in the middle comes out clean. 

Let it cool for at least 30 minutes before slicing. Store in an airtight container or plastic bag at room temperature.